“We shall have it like a coney in a trap. Then we shall see what kind of thing it is.”
-Unidentified Man of Gondor, The Two Towers
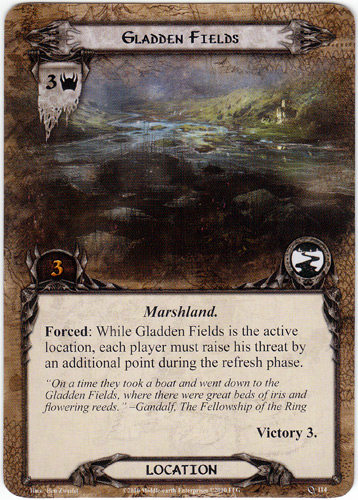
The threat level, which increased two during our battle with the Hill Troll, escalates one notch further to 31 — and then again to 32 because the current location is Gladden Fields, which has an unfortunate ‘forced’ effect:
Gandalf, who was so integral to the previous day’s planning, has to be dispatched to the discard pile (he must be discarded at the end of the round in which he is summoned) — although I have one more copy still in hand, and the third copy somewhere in the deck.
Our heroes’ status is as follows: Beravor, with two resource tokens and no damage, Theodryn, no resources and two damage, and Eowyn with no resources and no damage. Our other allies died in the previous day’s battles. The current location, which will need to be closed before we can continue questing, is the Gladden Fields.
And looming still in the encounter area, readying themselves for more battle, are Dol Guldur Orcs and a mortally wounded but still breathing Hill Troll. Our party vows that this day will be the last in which it breathes.
In our hand as the day dawns is the second Gandalf and two other allies — Faramir and the likely redshirt Snowbourn Scout. We also have three events at the ready: another Hasty Stroke, Unexpected Courage, and the wonderful Forest Snare.
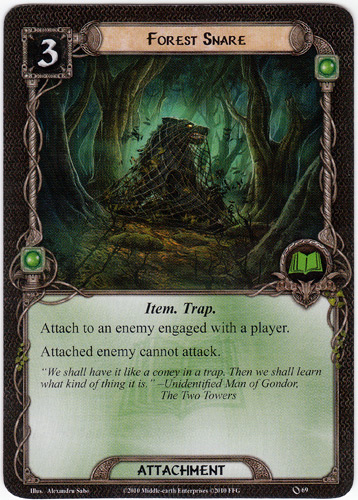
This is simply one of the best items in the core game.
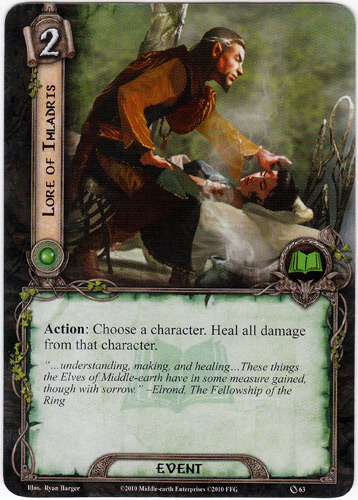
Resource Phase. We add one resource to each of our three heroes and Theodryn again taps his Steward for an additional two. We draw a great event card, Lore of Imladris:
Planning Phase. Theo spends one resource to summon the Snowbourn Scout, whose special power is that we are allowed to add one progress token to the current location, the Gladden Fields. We need only two more to close that location.
Next, Beravor spends three tokens to use her Forest Snare to entrap the Troll! [Note that this could not have been done in the last turn as the Snare can only be used in the Resource Phase, and on Day Three we hadn’t yet engaged the Troll.
Basically, we have found a way to finish the Troll off once and for all, without suffering further damage. It would have attacked first, and you’ll recall that the Troll’s excess damage is applied to the threat level. Thus, snaring him spares us that dangerous attack and allows our fellowship to land a fatal blow.
Quest Phase For this day, we opt not to commit any of our party to questing — all will be devoted to combat. As stated earlier in this AAR, deciding who in your party to commit to questing vs combat is perhaps the single biggest decision you face; you must balance the desire to progress in the quest against the need to keep the evil from encroaching. In this instance, with the Hill Troll ensnared and bleeding out, and no card in the staging area, we choose to focus on fighting.
Even without a single character questing, we must still play out the quest phase. We draw a new encounter card: Misty Mountain Goblins.
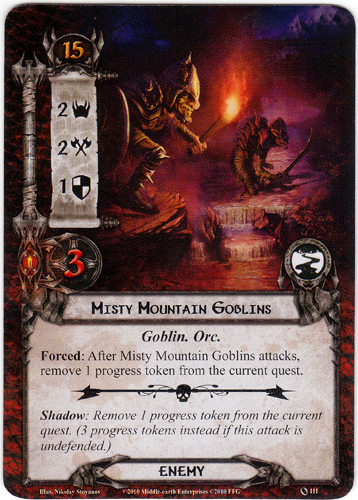
This is unfortunate. First, the Goblins have a threat level of 2, and as we have no committed to questing, those two points are applied to our party’s threat level, which rises from 32 to 34.
Second, the Goblins have an engagement cost of 15, meaning that they will automatically engage (move forward to do battle) in the encounter phase; we will have no choice but to fight them.
Travel Phase We are still in the Gladden Fields and thus will not travel. Because of the Fields’ forced effect, clearing this location soon is imperative.
Encounter Phase As noted a moment ago, we have no choice but to add the Misty Mountain Goblins to the others with whom we are to battle: the Hill Troll and Dol Guldur Orcs. So, on the fourth day of this journey, our party now faces the most enemies.
This, of course, makes our decision to ensnare the Troll all the more vital, as it means that only two of the enemies, and the weakest two, can attack. Here we make an important tactical decision: we decide we will not attack the Troll, who is hopelessly caught in our trap, because the delay will allow us to focus on the other two enemies.
Next we declare our defenders: the Snowbourn Scout will defend against the Goblins, and our hero Beravor will defend against the Orcs. For the latter battle, we draw a shadow card from the encounter deck: Evil Storm.

Fortunately Evil Storm has no Shadow effect, and its treachery power is, in this instance, moot — our threat level is below 35. That leaves the Orcs’ attack (2) versus Beravor’s defense (2) for no damage.
Next Eowyn attacks the Orcs, who are down to one health point. Her attack (1) vs Orcs defense (0) means a point of damage, enough to slay the vial creatures.
It is in the next battle, against the newly-arrived Goblins, that things go horribly astray. We draw the worst of all possible shadow cards, Pursued by Shadow:
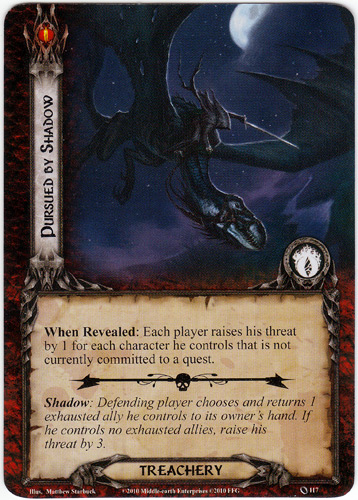
Ouch. The card’s shadow effect is operative here, not the ‘when revealed’ effect. This means our sole defender, Snowbourn Scout, is sent back to our hand. That means the Goblins’ attack (2) is undefended — and two hits of damage must be applied to one of our three heroes. Because Theodred already has lost two of four hits points, and because Eowyn only has three hit points total, we apply the damage to Beravor.
Theodred then attacks the Goblins and does one measly damage, so the group of creatures survives.
Sigh. The party had begun this turn hopeful that they could slay the Hill Troll and otherwise keep the status quo. Instead, the Troll still lives, the Goblins as well, two of the three heroes have grave wounds, and the threat to our intrepid party is higher than ever.
With that, the party rests by the campfire as the ensared Troll growls in the distance. His demise will have to wait for the morning.