Day One: Take Me to the River
But in the wild lands beyond Bree there were mysterious wanderers, The Bree-folk called them Rangers, and know nothing of their origin. -The Fellowship of The Ring
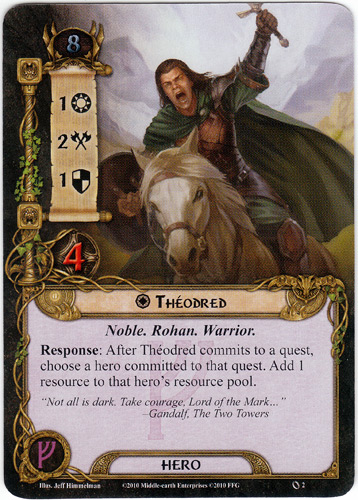
We launch our Journey Down the Anduin by setting the initial threat level — which is the total of the willpower of the three heroes, Eowyn, Theodred and Beravor.
THREAT LEVEL: 27
Staging Area: In addition to the Hill Troll, whose appearance in the staging area is part of this scenario’s setup, we also draw a card from the Encounter Deck to go in the staging area as part of setup. Only locations or enemies go into the staging area; the third type of Encounter Deck card, a treachery, does not. And that, in fact is what we draw:

Treacheries usually have an immediate effect when revealed. This one has two effects, but both are moot. The first, “Each location in the staging area gets +1 threat until the end of the phase” is moot because it was drawn as part of set-up. The second, “Then, each player with a threat of 35 or higher chooses and discards 1 cards from his hand” is moot because I, the only player, have a threat level of 27. So the card is discarded without impact on our nascent journey.
Resource Phase — Each of the three heroes receives one resource token. However, this scenario is considered the most difficult, and I have decided to play this using Fantasy Flight’s Easy Mode, which was created in response to complaints from players that the game was simply too hard solo. In easy mode, each hero receives an additional resource token at the start of the game, and a couple of the most difficult Encounter cards are removed before the start. So a little tweaking, and our heroes start with two resource each, rather than one.
The second part of the Resource Phase is to draw a card, and in this case, Luck looks kindly on us, as we draw the single most powerful card in the game: none other than the kindly wizard, Gandalf, who goes in to our hand.
Note: the Core Set has four copies of Gandalf, and it is perfectly legal to include more than one in a constructed deck. In this case, the deck I am using uses three copies. As I was dealt a Gandalf at the start of the game, I now have two of the three in my hand. They will both be held for more advantageous opportunities later.
Planning Phase: The Planning Phase allows you to spend resources to summon allies and attachments from your hand. You can also use resources to play one-shots called Events, but these can be played in any phase, not just Planning. If you think you’ll need to play an Event later in the turn, best to save some resources so you can afford to pay the card’s cost.
However, it is imperative to summon an ally in this initial turn. It is too soon to summon either of the Gandalf cards. In our hand are two other allies, the Miner of the Iron Hills and Erebor Hammersmith.


Here I spend Berevor’s two resources to summon the Miner, who will basically serve as cannon fodder.
Why Berevor? This is an important rule:
In order for a player to play a card from his hand (or
to activate certain card effects), he must pay for it by
spending resource tokens from the resource pool of a
hero who has a resource icon that matches the card’s
sphere of influence. This is called a resource match.
Resources that are spent to pay for cards or card effects
are taken from their hero’s resource pool and placed in
the general token bank.
So in this instance, the Miner is of the Lore sphere, so I must spend two resources belonging to a hero from that sphere — in this case, Beravor, — to summon.
Next, I spend two resources from Theodred (Leadership sphere) to summon a great attachment, Steward of Gondor:
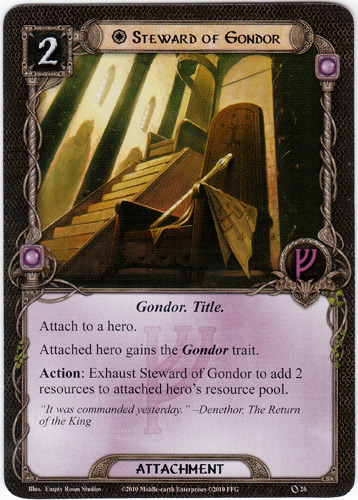
The Steward is basically a license to print money. For every turn in which I exhaust the card, I get two extra resource tokens for that hero. Now — just because I used Theodred to summon the Steward, doesn’t mean I have to attach it to him; it can go on another hero or ally. But in this case, I do in fact attach it to Theodred. These means I will have extra resource tokens of the Leadership Sphere each turn, and I know there are some good cards to come that requires precisely that.
The Steward’s power is an Action, which I can do at any time, as in right now! Right after it is summoned, I exhaust it and place two resource tokens on Beravor. “Wait!” you shout, “shouldn’t they go on Theodred, who controls the attachment?” Yes, you are correct. I screwed up. It is easy to make mistakes in this game.
But, onward. I then spend Beravor’s two NEW resource tokens to summon the other ally in my hand, Erebor Hammersmith. Thus I end the Planning Phase with two allies joining the party, and a very important attachment now thoroughly attached.
Quest Phase This brings us to the single most important decision of each turn — how many heroes and allies to commit to questing (trying to advance the quest) and how many to leave behind for possible battle. If you commit too many to the former, bad beasties will get the best of you. If you commit too many to the latter, you basically will be stuck. It’s a friggin’ balancing act, and the decision is, in my view, the heart of the game.
So here we have three heroes and two allies. There are no enemies in the engagement area, and the only enemy in the staging area, the Hill Troll, has a threat level of 30 — that means it will not automatically move forward to engage until my threat level hits 30. Another Encounter Deck card will soon come out, and we must prepared for it being another enemy which might automatically engage.
With this in mind, we decide to commit two heroes, Eowyn (Willpower of 4) and Theodred (Willpower of 1) to the quest. The two heroes are ‘exhausted’ when they commit. Do you see Theodred’s response below? Committing him to a quest gives me an additional resource token (which can go on any hero) that I give to Beravor.
The next part of the Quest Phase is staging. From the rulebook:
The staging area is a unique element of the game’s
playing field. It represents the potential dangers the
players might face as they progress on their quest.
During the quest phase, enemy and location cards are
revealed from the encounter deck and placed in the
staging area. Cards in the staging area are imminent
threats to the players, including enemies that need to
be defeated and locations that need to be explored.
In short, when you get to staging, you pull a card from the (evil) encounter deck and it could change the threat level of the enounter to which you’ve just committed. In this case, the card I chose is a location card, Banks of Anduin:
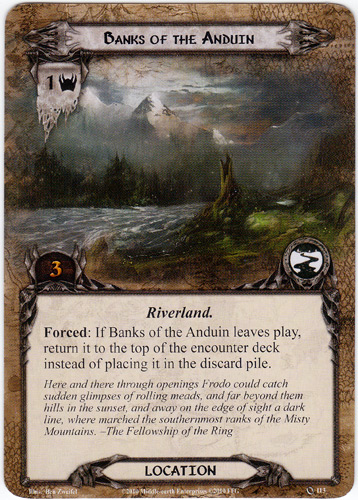
This adds 1 to the threat level of the current quest, combined with the Hill Troll’s threat level, also 1.
Next we resolve the quest by subtracting the threat level from the heroes’ willpower. Theodred (1) plus Eowyn (4) = 5. Subtracting the threat of 2 gives us (drum roll please) 3!
If the willpower is higher, the players have successfully
quested, and they make progress on the quest. A
number of progress tokens equal to the amount by
which their willpower overcame the threat are placed on the
current quest card.
So three progress tokens go on the current quest card, which is To the River.
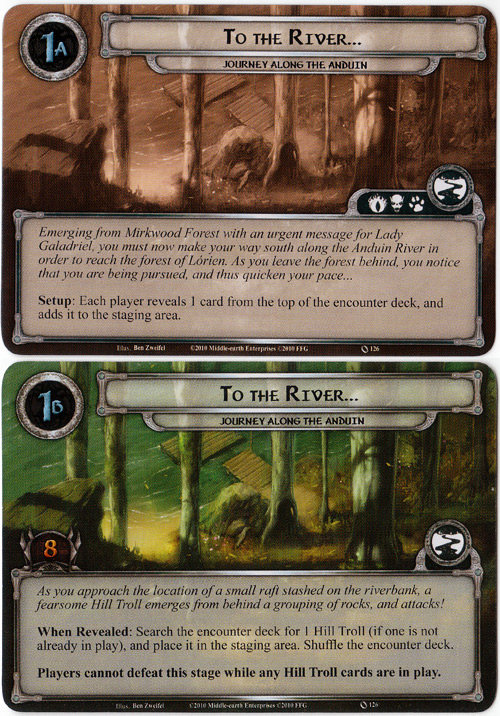
We have now notched 3 of the 8 progress tokens we need to move beyond To the River. This brings the Quest Phase of Turn One to a close.
Travel Phase This next phase is simple. I can choose to have the party travel to a location that is in the staging area. By doing so, it removes the threat of that location from the threat total during questing. So now I will have the party travel to Banks of Anduin, which appeared a few moments ago during the staging.
With Banks of Anduin as the current location, I will need to close that out in later turns before I can return to making progress of the main quest. In other words, this is an optional side quest, but advisable because it will make all quests easier.
Encounter Phase The encounter phase, which is the heart of battle in LOTR: LCG, is moot on Turn One. The only visible enemy, Hill Troll, is has an engagement cost of 30, higher than our party’s threat level 27. Thus we are not required to fight the Troll. He stays in the staging area, lurking until we hit 30. We could choose to fight him, but that would be ill-advised. So for now, no combat.
This would normally bring the first turn to an end, but I have one last trick up my sleeve. I decide to exhaust the hero Beravor. You will recall that I exhausted the other two heroes when committing them to the quest, but Beravor is still at the ready. And her special ability:
Exhaust Beravor to choose a player. That player draws 2 cards.
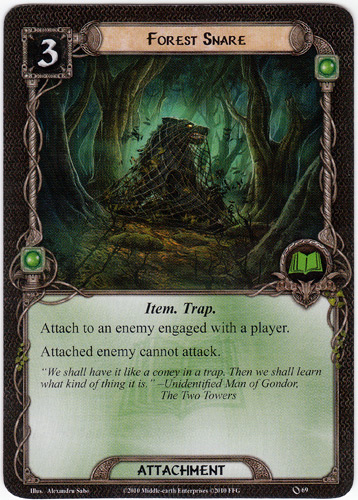
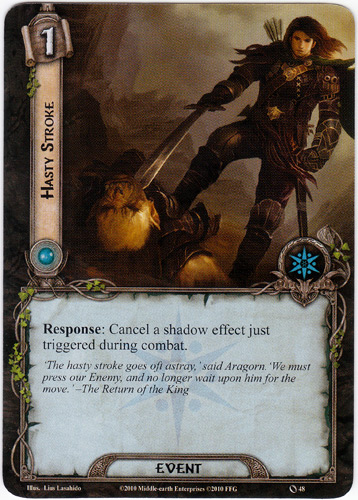
So I draw two extra cards into my hand, and they will both prove helpful: Forest Snare and Hasty Stroke.
Coming next: turn two, and we lay our plans to ensare the Hill Troll!